To successfully migrate your existing V1 database to be compatible with the new V2 codebase Click here.
Installation
Introduction
The installation of JupiterMeet Pro is very easy and straightforward. This guide will help you run the bash script which will install and configure all the dependencies required to run the project properly on a clean Ubuntu 22.04 or CentOS 7 server. A basic knowledge of terminal is required.
Please follow all the steps very carefully. Once you have the dependencies installed, you can use the web installer to install the application from the browser itself.
VPS
Ubuntu 22.04 or CentOS 7 with minimum of 8 GB RAM is a recommended VPS.
Check out this link to get a cheap VPS hosting.
Automatic installation
Make sure the server is empty, otherwise it may create issues. Click here if you prefer the manual way.
-
Upload the bash script (jupitermeet-installation.sh) and
the application (jupitermeet.zip) to your server
Note: Place the zip and the script in same directory
-
Set execute permission on script
chmod 700 jupitermeetpro-installation.sh -
Execute the script
./jupitermeetpro-installation.sh
Once the installation is finished, note down all the details it returns.
Application setup
-
Open yourdomain.com/install in the browser
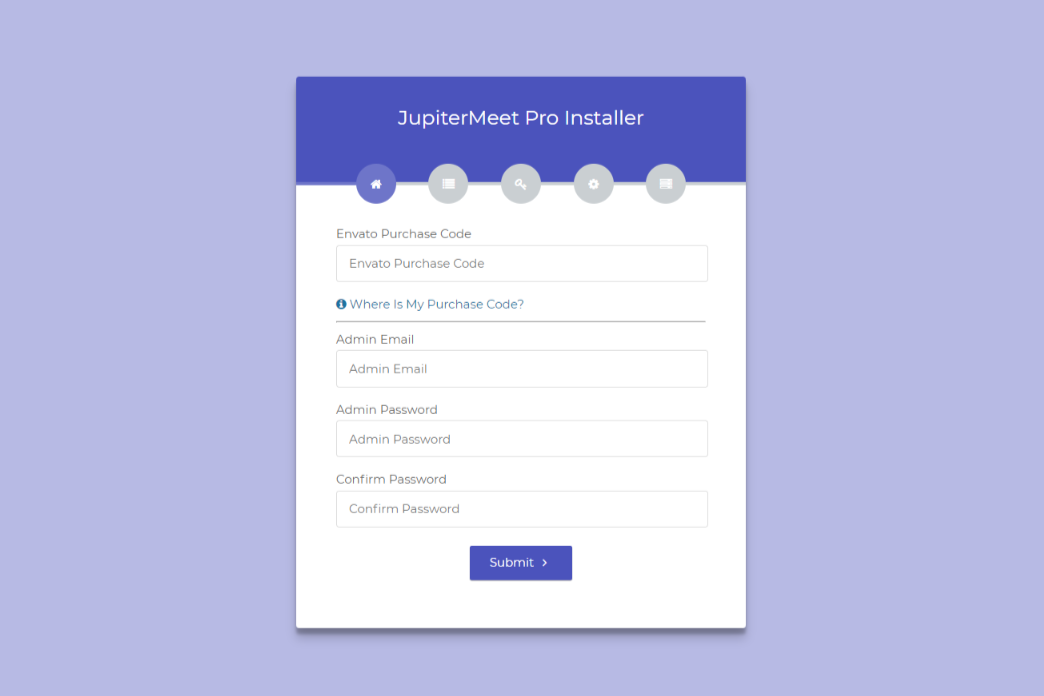
-
.env section: Follow all the steps very carefully
and udpate the values as below
-
Application
- APP_ENV: local or live. Based upon where you want to setup
- APP_KEY: No need to change
- APP_DEBUG: true or false. Generally, true in local server and false on live
- APP_LOG_LEVEL: No need to change
- APP_URL: Your application URL
- Please add qoutes if env variables have space in it
- Click save and Install (Make sure you click 'Save .env' before clicking on Install)
Turn on 'less secure apps' from your Google account to allow the application to send emails
- Go to your (Google Account).
- On the left navigation panel, click Security.
-
On the bottom of the page, in the
Less secure app access panel, click
Turn on access.
- Click the Save button.
Note: The application will send emails in the following cases,
Signaling
Navigate to the /server directory from terminal.
cd /var/www/html/jupitermeet_pro/server
Run on live
npm run live
Run on local server
npm run local
NodeJS
Login and navigate to the Admin > Setting > NodeJS module.

- SSL Key Path: Path to your SSL key
- SSL Certificate Path: Path to your SSL certificate
- IP Address: Server's IP address
- Announced IP Address: Useful when running application behind NAT with private IP
- Port: Port to run NodeJS on
- Maximum File Size: In MB
- RTC MIN PORT: Minimun RTC port
- RTC MAX PORT: Maximum RTC port
- AI Chatbot API Key: Your secret AI Chatbot key
- AI Chatbot API URL: No need to change
- AI Chatbot Model: AI Chatbot model
- AI Chatbot Seconds: The number of seconds a user must wait before sending another message
- AI Chatbot Message Limit: The maximum number of messages a user can send during a meeting
- AI Chatbot Maximum Conversation Length: The maximum number of recent messages sent to AI Chatbot
Note: These last three settings mentioned above are designed to prevent the misuse of AI Chatbot.
For ChatGPT:
For DeepSeek:
Configuration
Storage link (optional)
If you see a broken logo, that means the storage link has not been created, use this command (from root project directory)
php artisan storage:link
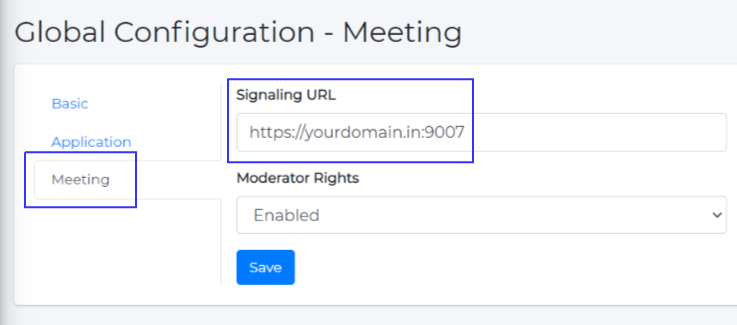
Settings
- Login and navigate to the Admin > Settings module
- Here you can update application name, logo, theme color etc
- Update the Signaling URL with your domain and port
Cronjob
-
Configure cron jobs to:
- Receive email notifications when the signaling server is unreachable or down.
- Automatically clean up activity log records older than two months to maintain optimal database performance.
Run Command
crontab -e
Insert the following cron expression into your crontab file to run the Laravel scheduler:
* * * * * cd /var/www/html/jupitermeet_pro && php artisan schedule:run >> /dev/null 2>&1
License Fix
If your server IP associated with the license code has changed, visit yourdomain.com/resolve-license and enter your license code to resolve the issue.
Payment Configuration
- Enable payment mode from Admin > Settings
- Extended License is required to enable the payment mode. Updrade to the Extended License
- Login and navigate to the Admin > Manage Payment > Payment Gateways
- Here you can enable payments and set payment credentials
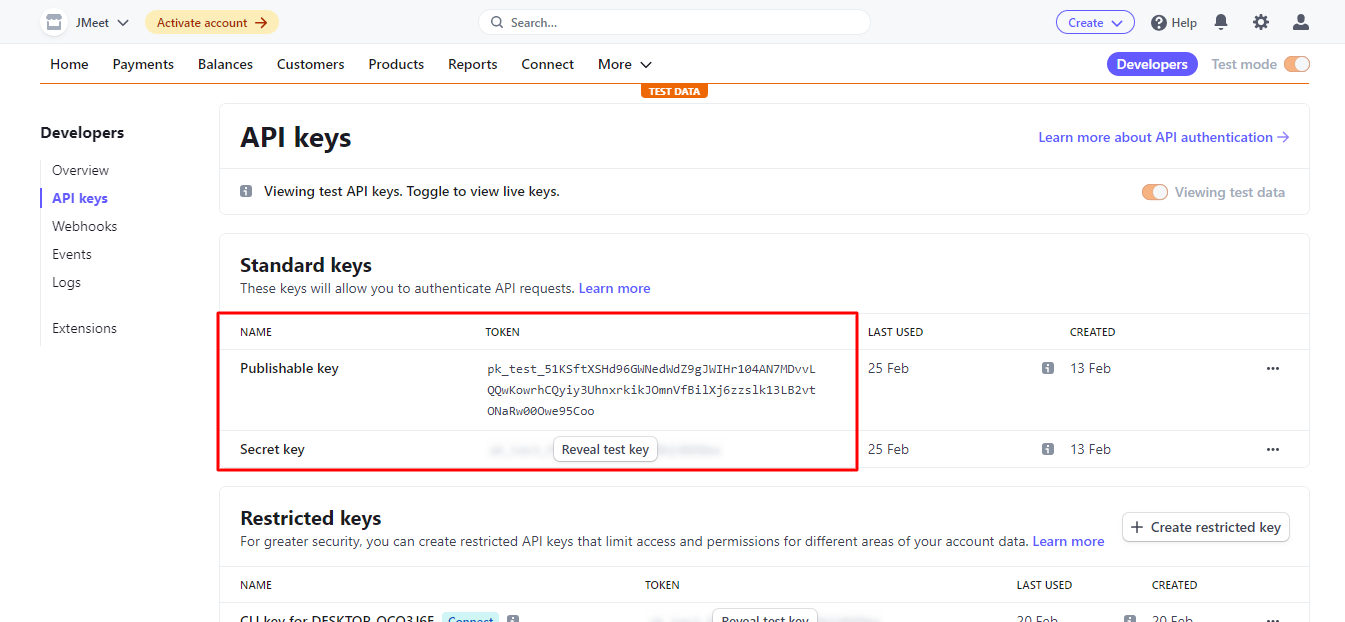
Stripe
- Login into your Stripe account
- Go to the Developers section of the Stripe dashboard and click on API Keys
- Copy the Publishable key and Secret key in Admin > Manage Payment > Payment Gateways > Stripe
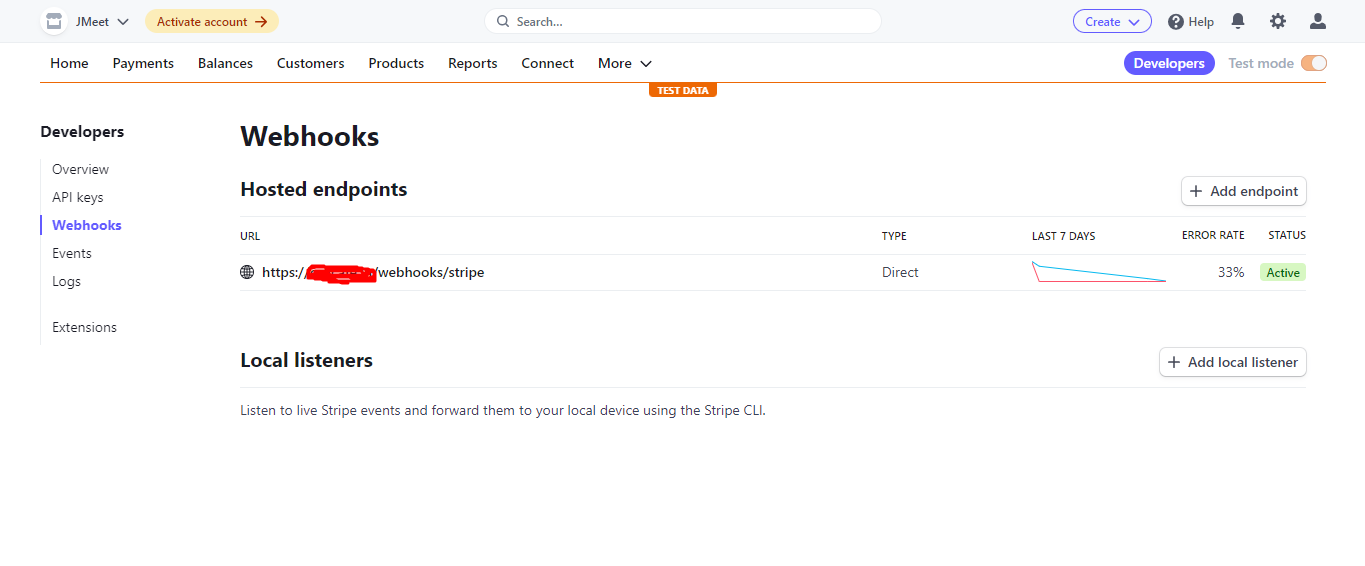
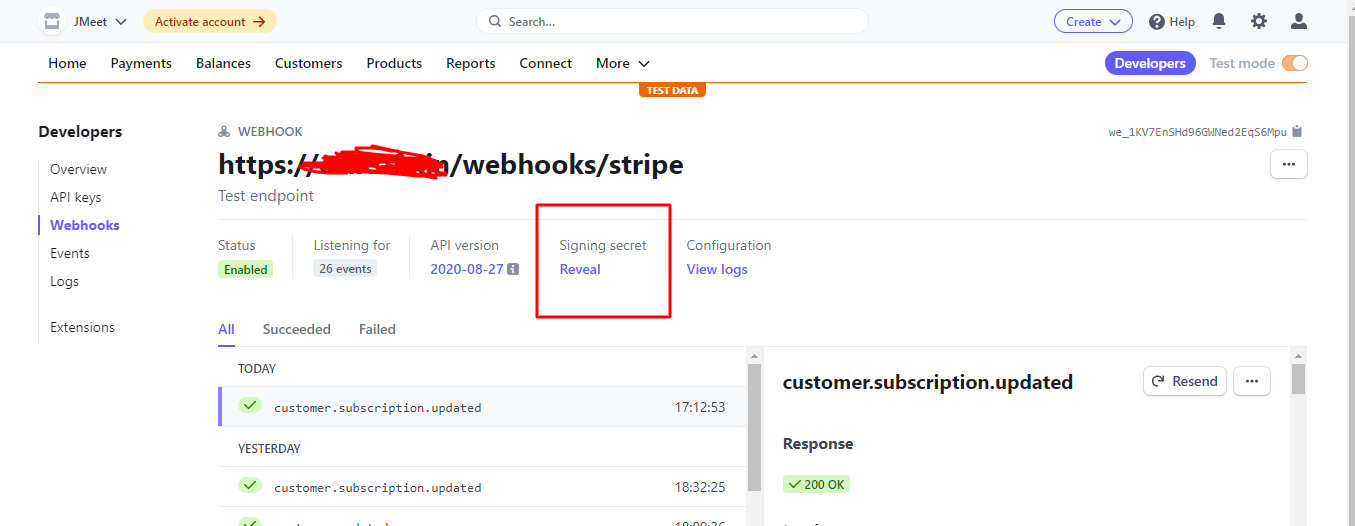
- From the sidebar, go to the Developers section of the Stripe dashboard and click on Webhooks. and Click on Add a new endpoint
-
On the
Endpoint URLfield paste your webhook URL, this can be found on Admin > Manage Payment > Payment Gateways > Stripe. - On the Events to send field, click on receive all events, and click the Add endpoint button.
-
Copy the
Signing secretin Admin > Manage Payment > Payment Gateways > Stripe.
Paystack
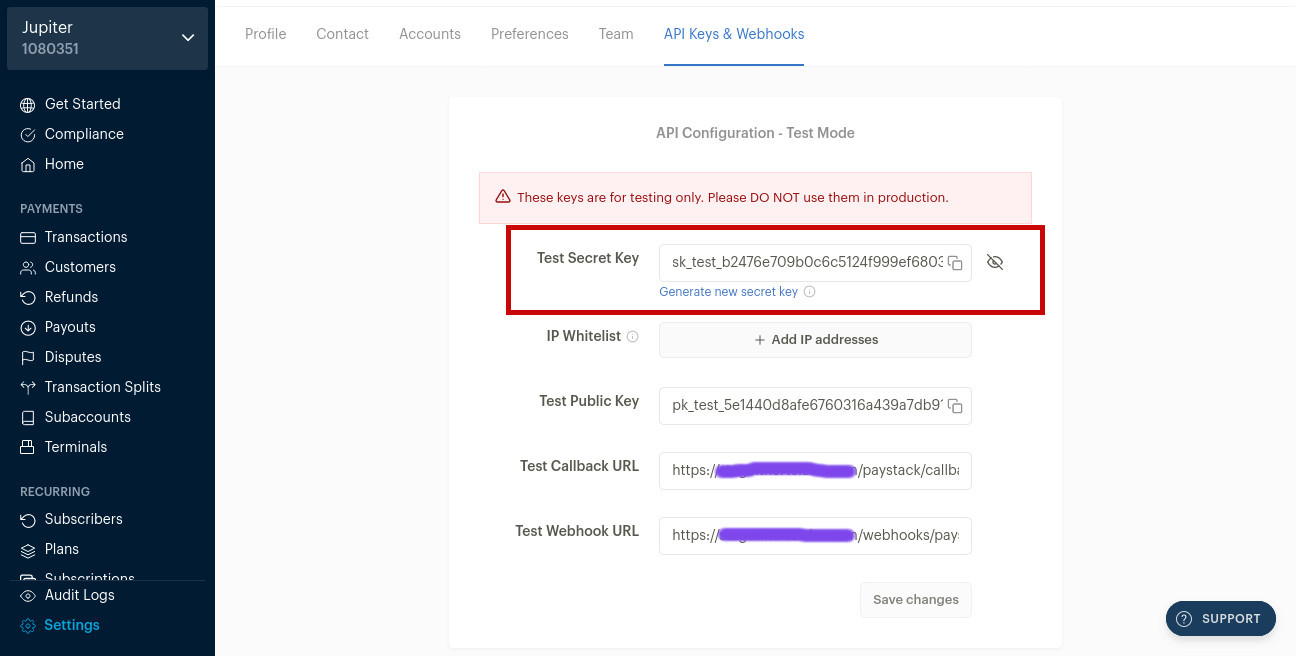
- Login into your Paystack account
- Go to the Setting section of the Paystack dashboard and click on API Keys
-
Copy the
Secret keyin Admin > Manage Payment > Payment Gateways > Paystack -
On the
Webhook URLfield paste your webhook URL, this can be found on Admin > Manage Payment > Payment Gateways > Paystack. -
On the
Callback URLfield paste your Callback URL, this can be found on Admin > Manage Payment > Payment Gateways > Paystack.
Mollie
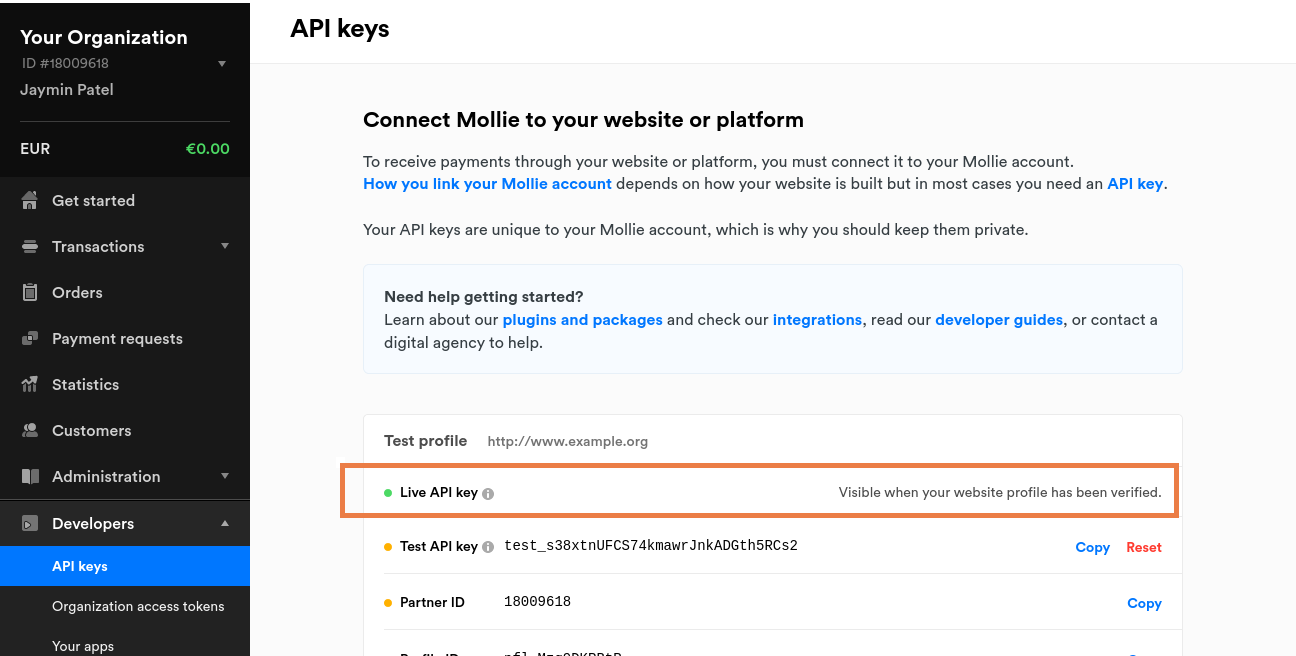
- Login into your Mollie account
- From the top menu click on More and then click on Developers
-
Copy the
Live API keyin Admin > Manage Payment > Payment Gateways > Mollie.
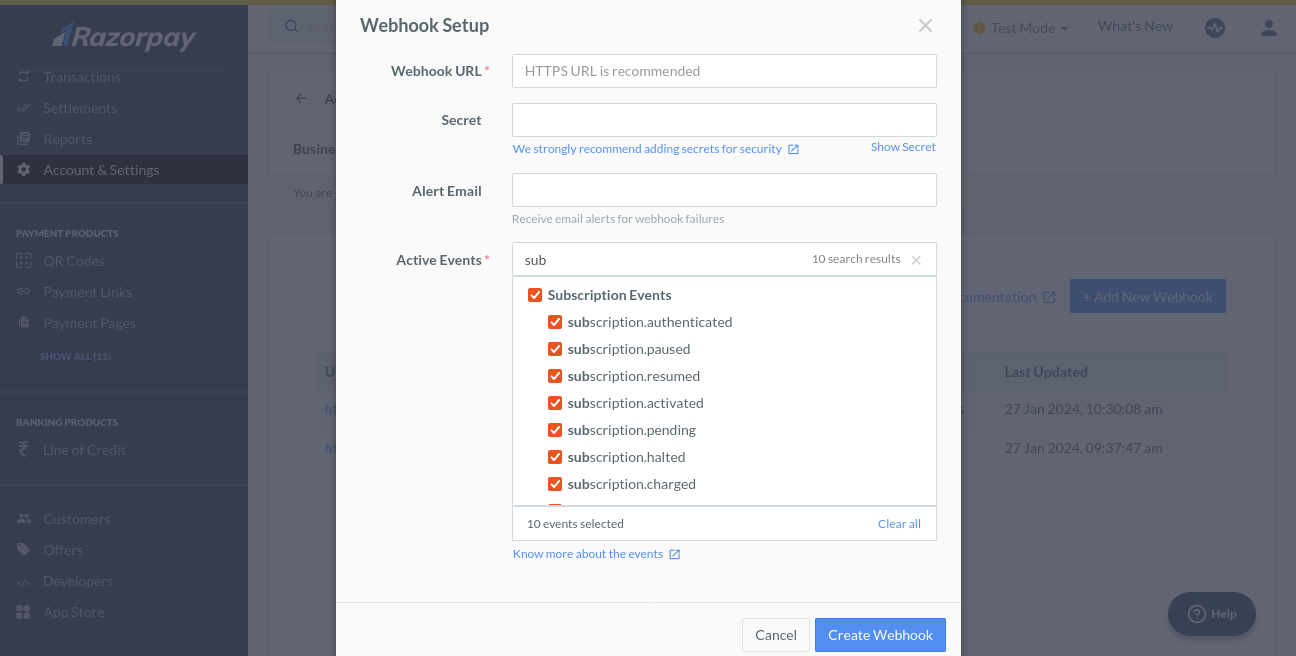
Razorpay
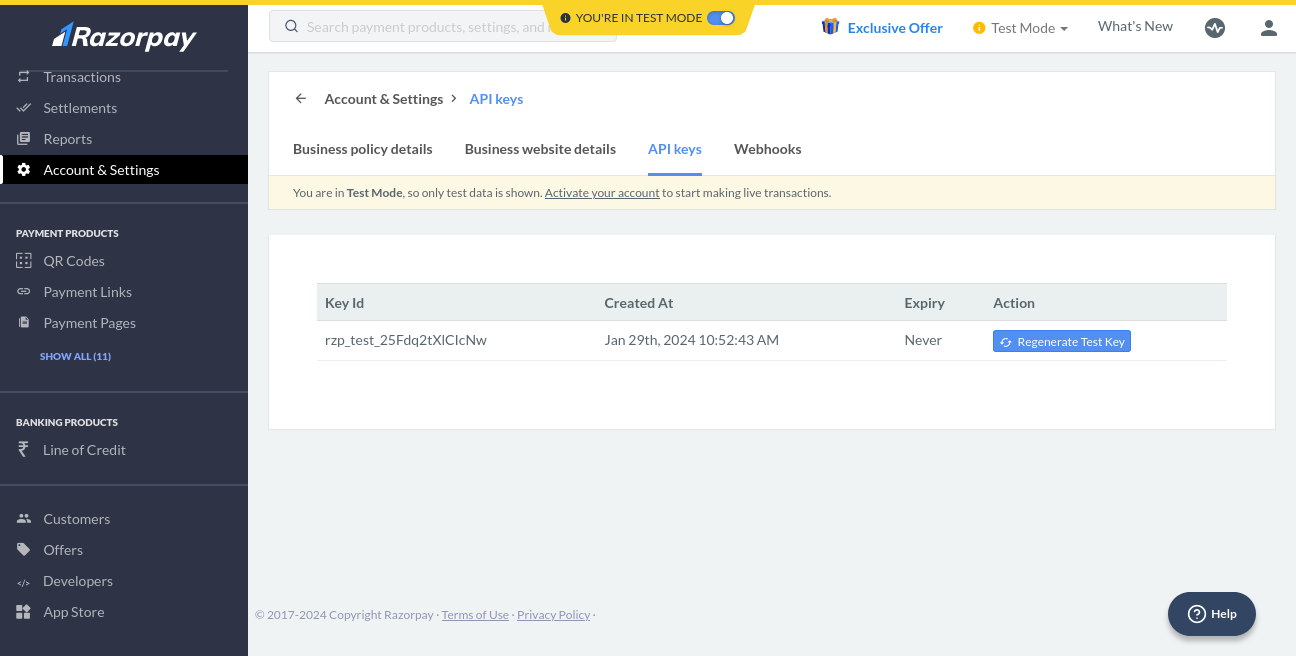
- Login into your Razorpay account
- Click on Account & Settings in the sidebar, the Choose API Keys Menu Option and click Generate Key button
-
Copy the
Key IdandKey Secretin Admin > Manage Payment > Payment Gateways > Razorpay. - Click on Account & Settings in the sidebar, the Choose Webhooks Option and click Add New Webhook
-
On the
Webhook URLfield paste your webhook URL, this can be found on Admin > Manage Payment > Payment Gateways > Razorpay. - On Active Events field checked Subscription Events and then save
PayPal
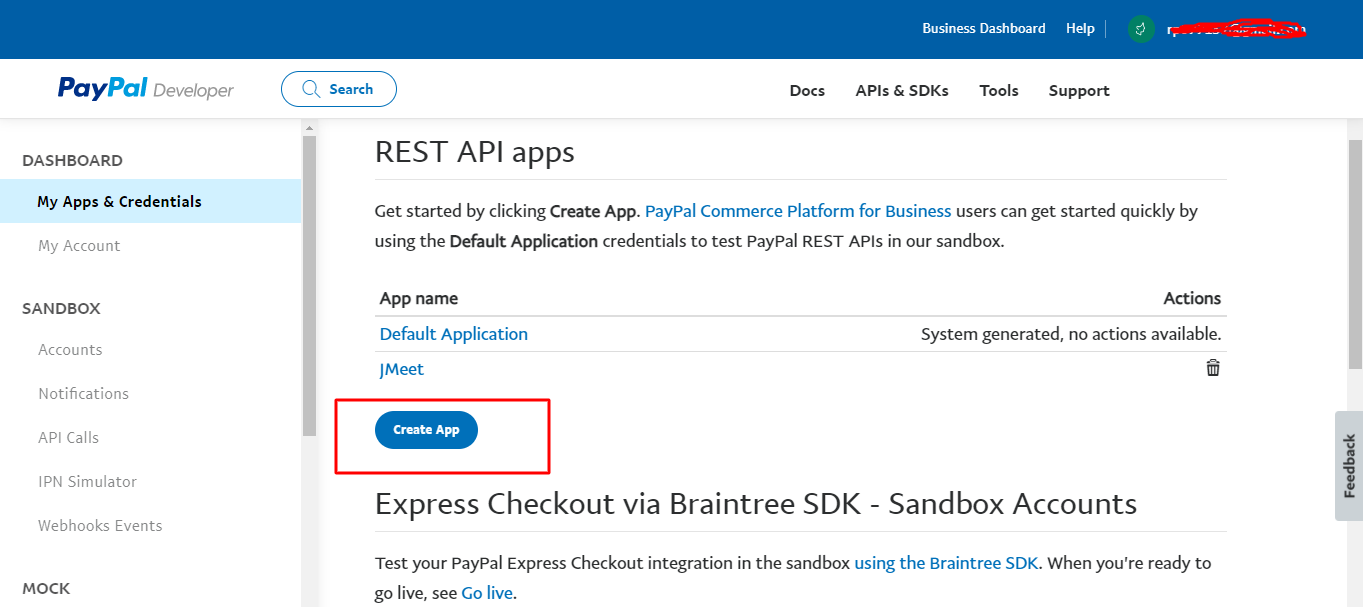
- Login into your Paypal account
- Go to the My apps & credentials section, click on Live button and then on the Create app button.
-
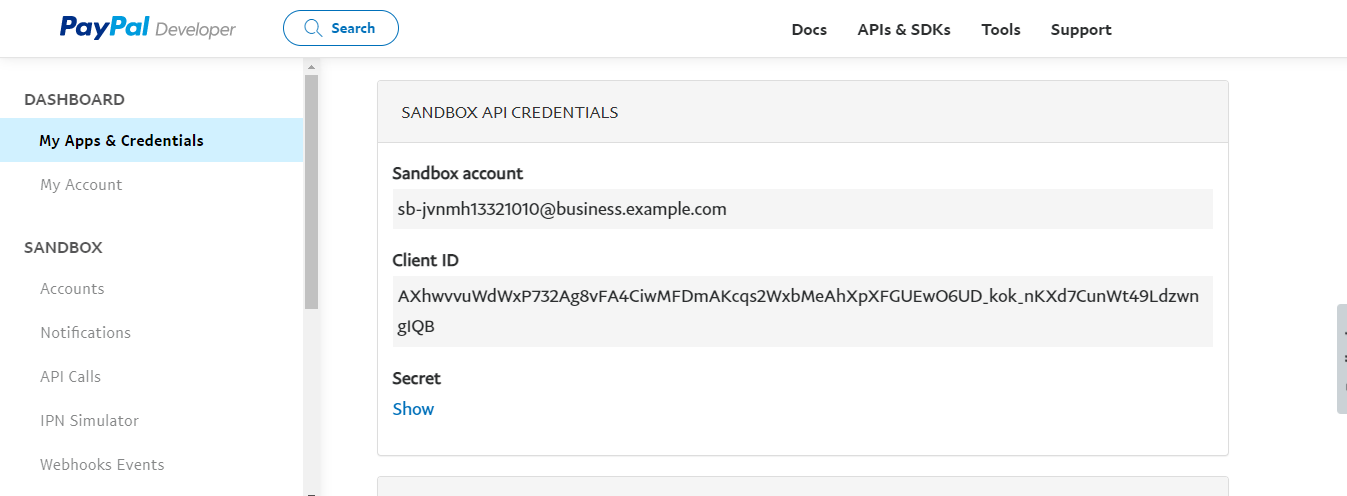
Copy the
Client IDandSecretin Admin > Manage Payment > Payment Gateways > PayPal. - Go to the My apps & credentials section, click on Live button and then select your app.
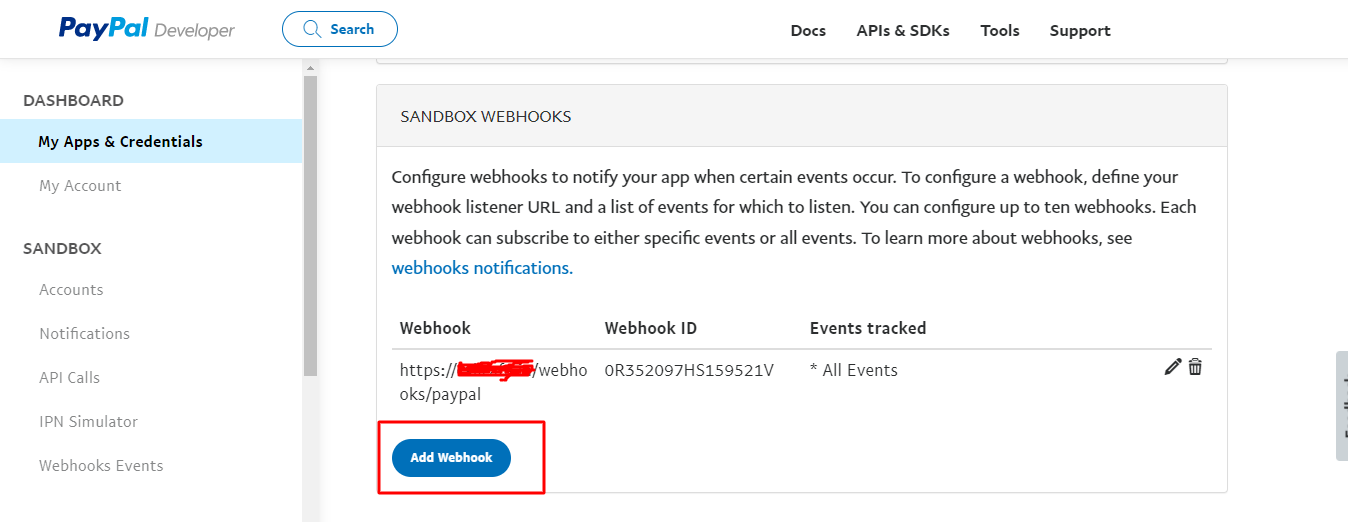
- Scroll down to LIVE WEBHOOKS and click on the Add webhook button.
-
On the
Webhook URLfield paste your webhook URL. This can be found on Admin > Manage Payment > Payment Gateways > PayPal. - Under the Events types select All events and save your changes.
- Copy the Webhook ID in Admin > Manage Payment > Payment Gateways > PayPal.
Localization
To add a new language, Download the Sample English File from the Languages section in the Admin panel. After editing to your language, click on the Create button and add that edited file.
When an update is made and more texts are added to the English file, download the sample as well as your language file, translate the difference and save it.
Landing Page
Customizing the Landing Page
-
Images: To update landing page images, replace the files located in the
public/images/landing-pagedirectory with your desired images. -
Text Content: To modify the landing page text, edit the
en.jsonfile for English content. Each language has its own JSON file—update the corresponding file to change the content in that language. - Note: Do not alter the keys in the JSON files; only update the values to ensure proper functionality.
Configure Firewall (optional)
If Firewall is active, please open the below ports for signaling server.
- 443 TCP
- 9007 TCP
- From RTC_MIN_PORT to RTC_MAX_PORT UDP
Manage Processes
Manage processes with PM2
Manage NodeJS
View running processes
pm2 list
Restart NodeJS server
pm2 restart JupiterMeetPro
Renew SSL
Let's Encryt will renew certificates automatically but if you need to do it manually, use the below command.
certbot renew
Troubleshooting
- Make sure NodeJS server is up and running
- Make sure frontend is pointing to the NodeJS server with your signaling port (9007)
- If firewall is active, make sure the ports are allowed
- If the application is running behind NAT with private IP, add Announced IP Address in Admin > Settings > NodeJS
- Make sure the app is running on https
- Make sure the SSL certificates are valid
- Make sure no antivirus softwares are blocking the media device access
- To reflect the changes, please clear browser cache or hard reload the page
APIs
Note: API Token will be generated from User > Profile > API Tokens section.
While calling the below APIs, you must pass the token in the request header as:
Authorization: Bearer <your_api_token>
Meeting APIs
-
Create Meeting
Endpoint:https://yourdomain.com/api/create-meeting
Method: POST
Parameters: title (required), description, password, date (YYYY-MM-DD), time, timezone
Returns: Meeting details
Notes: Title is mandatory. -
Edit Meeting
Endpoint:https://yourdomain.com/api/edit-meeting
Method: POST
Parameters: id (required), title, description, password, date (YYYY-MM-DD), time, timezone
Returns: Updated meeting details
Notes:- ID is mandatory.
- Only send the parameters you want to update.
-
Delete Meeting
Endpoint:https://yourdomain.com/api/delete-meeting
Method: POST
Parameters: id (required)
Returns: Success message (meeting deleted)
Notes: ID is mandatory.
User APIs
User APIs are restricted to admin-level access. You must use an API token generated from an admin account to call these endpoints.
-
Create User
Endpoint:https://yourdomain.com/api/create-user
Method: POST
Parameters: first_name (required), last_name (required), username (required), email (required), password (required)
Returns: User details
Notes: All parameters are mandatory. -
Edit User
Endpoint:https://yourdomain.com/api/edit-user
Method: POST
Parameters: id (required), first_name, last_name, username, email, password, status ("active" or "inactive")
Returns: Updated user details
Notes:- ID is mandatory.
- Only send the parameters you want to update.
- Status can only be "active" or "inactive".
-
Delete User
Endpoint:https://yourdomain.com/api/delete-user
Method: POST
Parameters: id (required)
Returns: Success message (user deleted)
Notes: ID is mandatory.
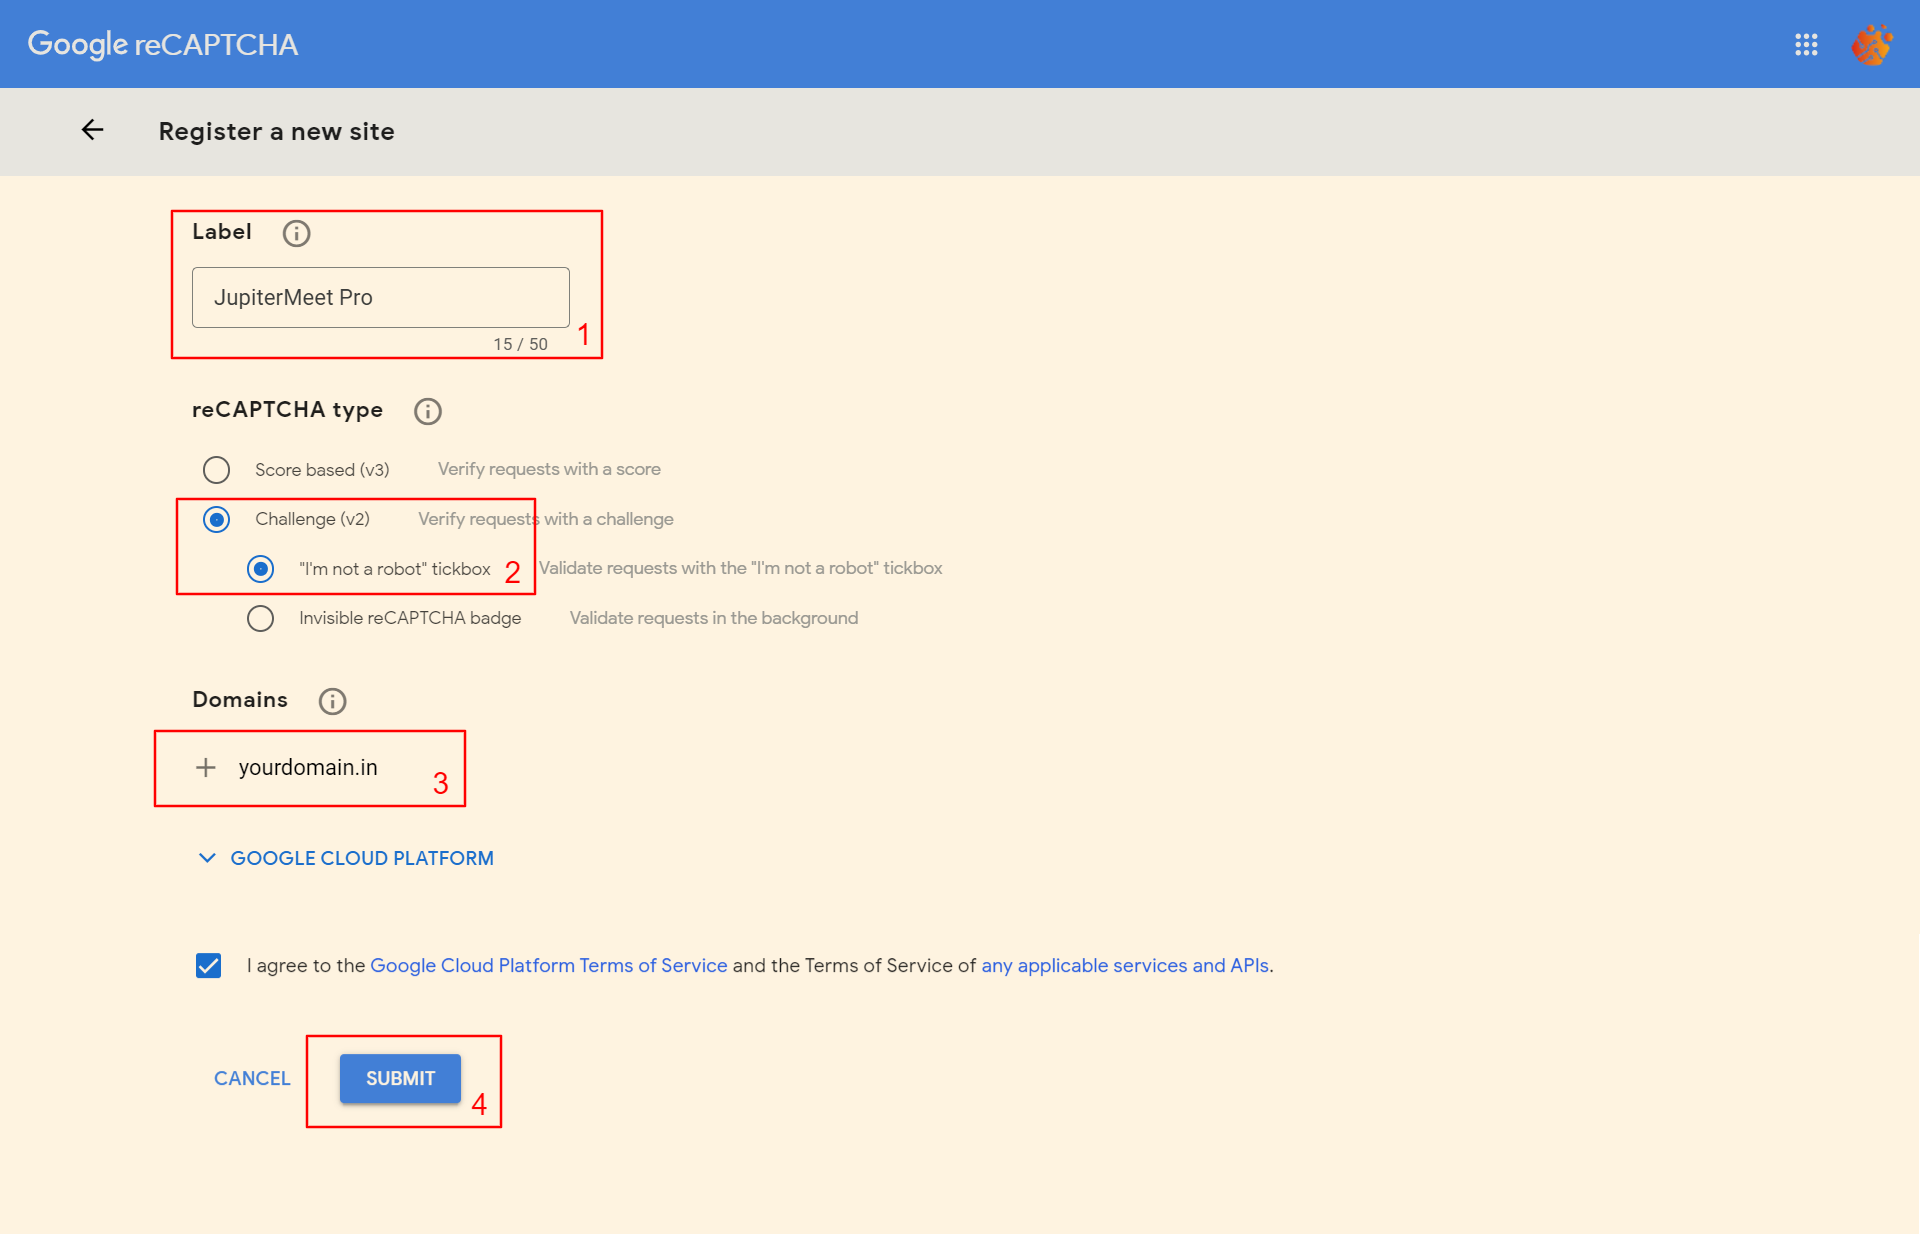
Google reCAPTCHA
This feature adds an extra layer of security on the checkout page. Follow the steps below to setup Google reCAPTCHA.
- Go to this link https://www.google.com/recaptcha/admin/create and register a new site.
- Once done, copy and paste the Key and Secret in the Admin panel > Settings > Google reCAPTCHA section.
Email Jobs
The application uses Laravel's Queue feature to send out meeting invite emails.
Navigate to the project directory (/) from terminal.
cd /var/www/html/jupitermeet_pro
Run jobs
pm2 start jobs
Save the processes
pm2 save
AI Chatbots
You can integrate the following AI chatbots into your application to make them available during meetings. Simply follow the steps listed under each chatbot to set it up. A link is also provided to help you choose the model you’d like to use for that chatbot.
ChatGPT
This feature allows users to use ChatGPT during the meeting. Follow the steps below to setup ChatGPT.
- Go to this link https://platform.openai.com/api-keys and create new secret key as shown below.
- Once done, copy and paste the Secret key in the Admin > Settings > NodeJS. For detailed clarification of each configuration, please check the Signaling section above.
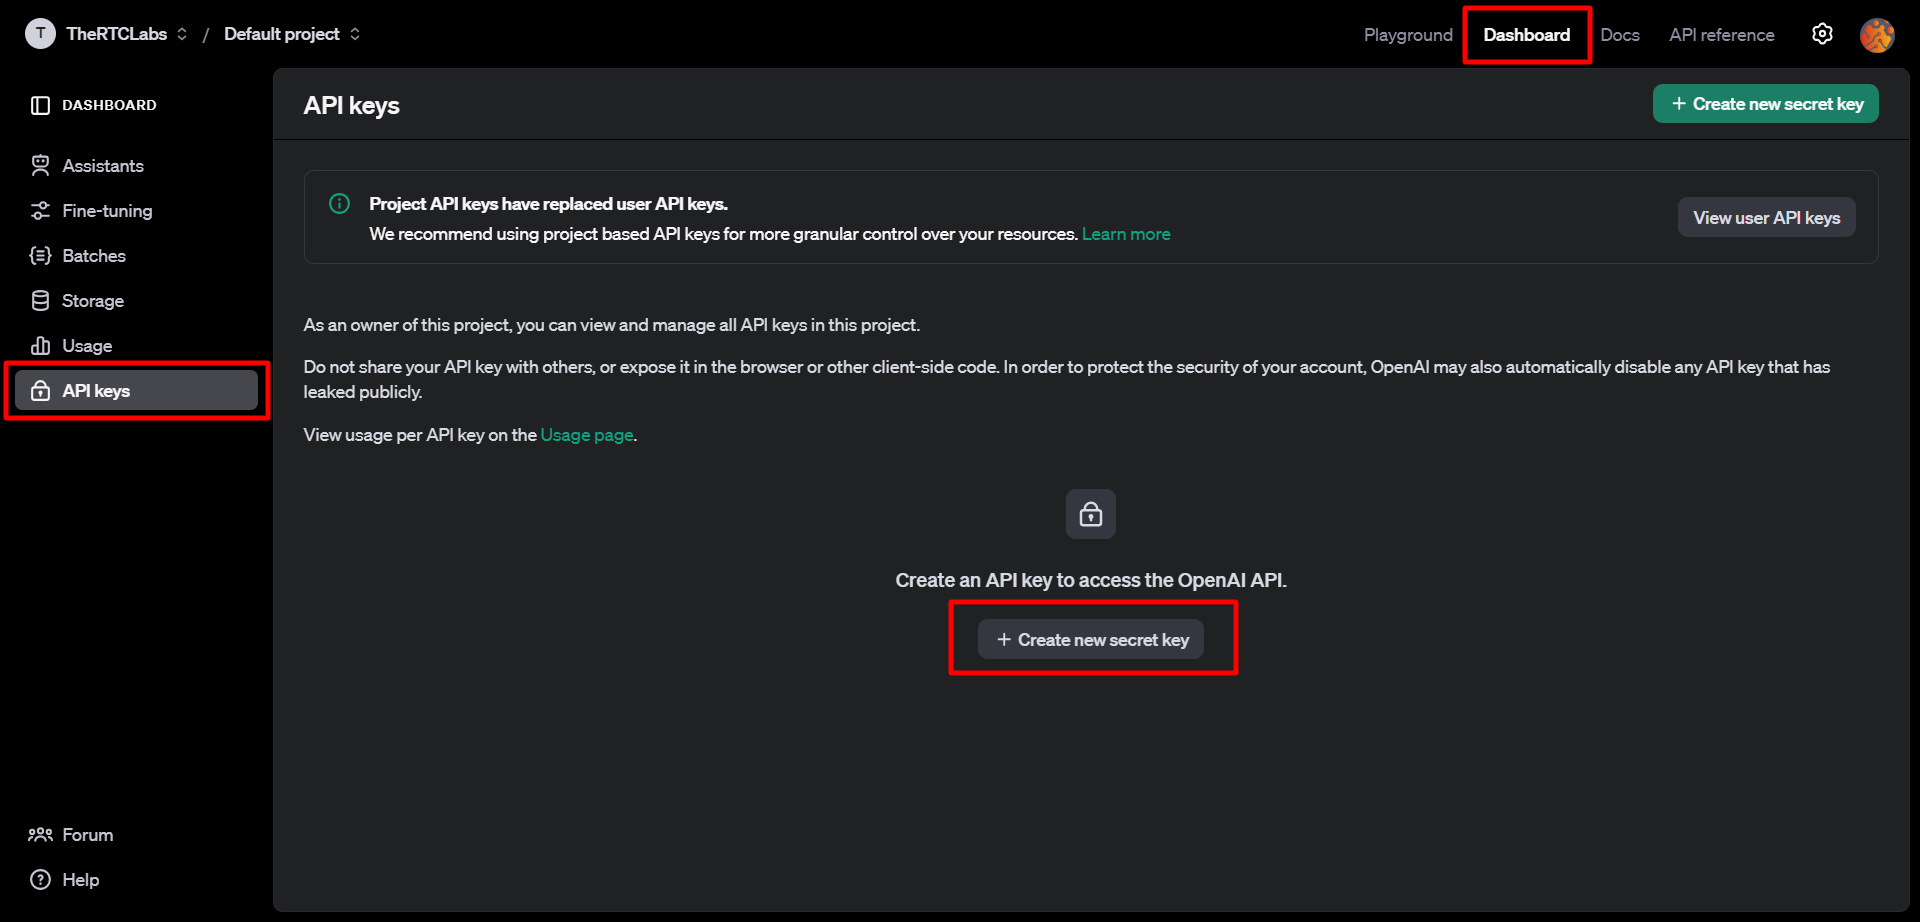
Note: To disable this feature, navigate to Admin > Plans > Edit Default Plan, then turn off AI Chatbot in the Features section.
You can choose a model from the following link: OpenAI Models
DeepSeek
This feature allows users to use DeepSeek during the meeting. Follow the steps below to setup DeepSeek.
- Go to this link https://platform.deepseek.com/api_keys and create new secret key as shown below.
- Once done, copy and paste the Secret key in the Admin > Settings > NodeJS. For detailed clarification of each configuration, please check the Signaling section above.
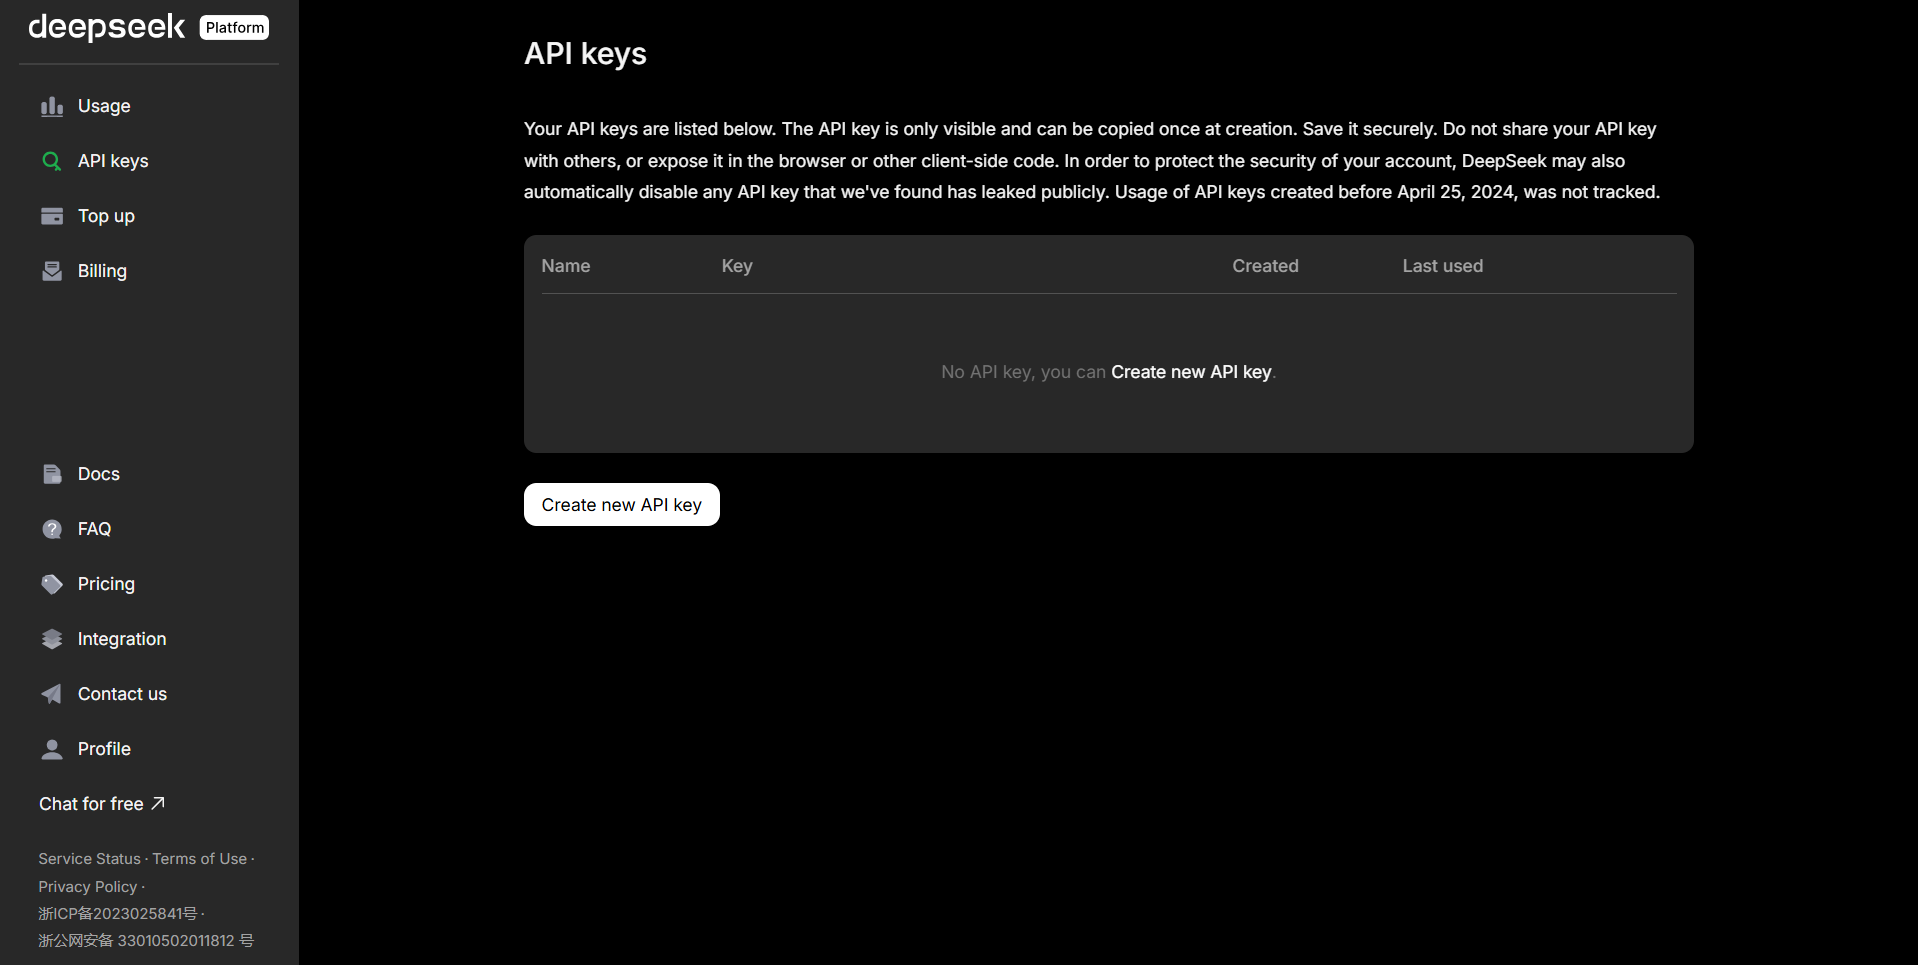
Note: To disable this feature, navigate to Admin > Plans > Edit Default Plan, then turn off AI Chatbot in the Features section.
You can choose a model from the following link: DeepSeek Models
Gemini
This feature allows users to use Gemini during the meeting. Follow the steps below to setup Gemini.
- Go to this link https://aistudio.google.com/apikey and create new secret key as shown below.
- Once done, copy and paste the Secret key in the Admin > Settings > NodeJS. For detailed clarification of each configuration, please check the Signaling section above.
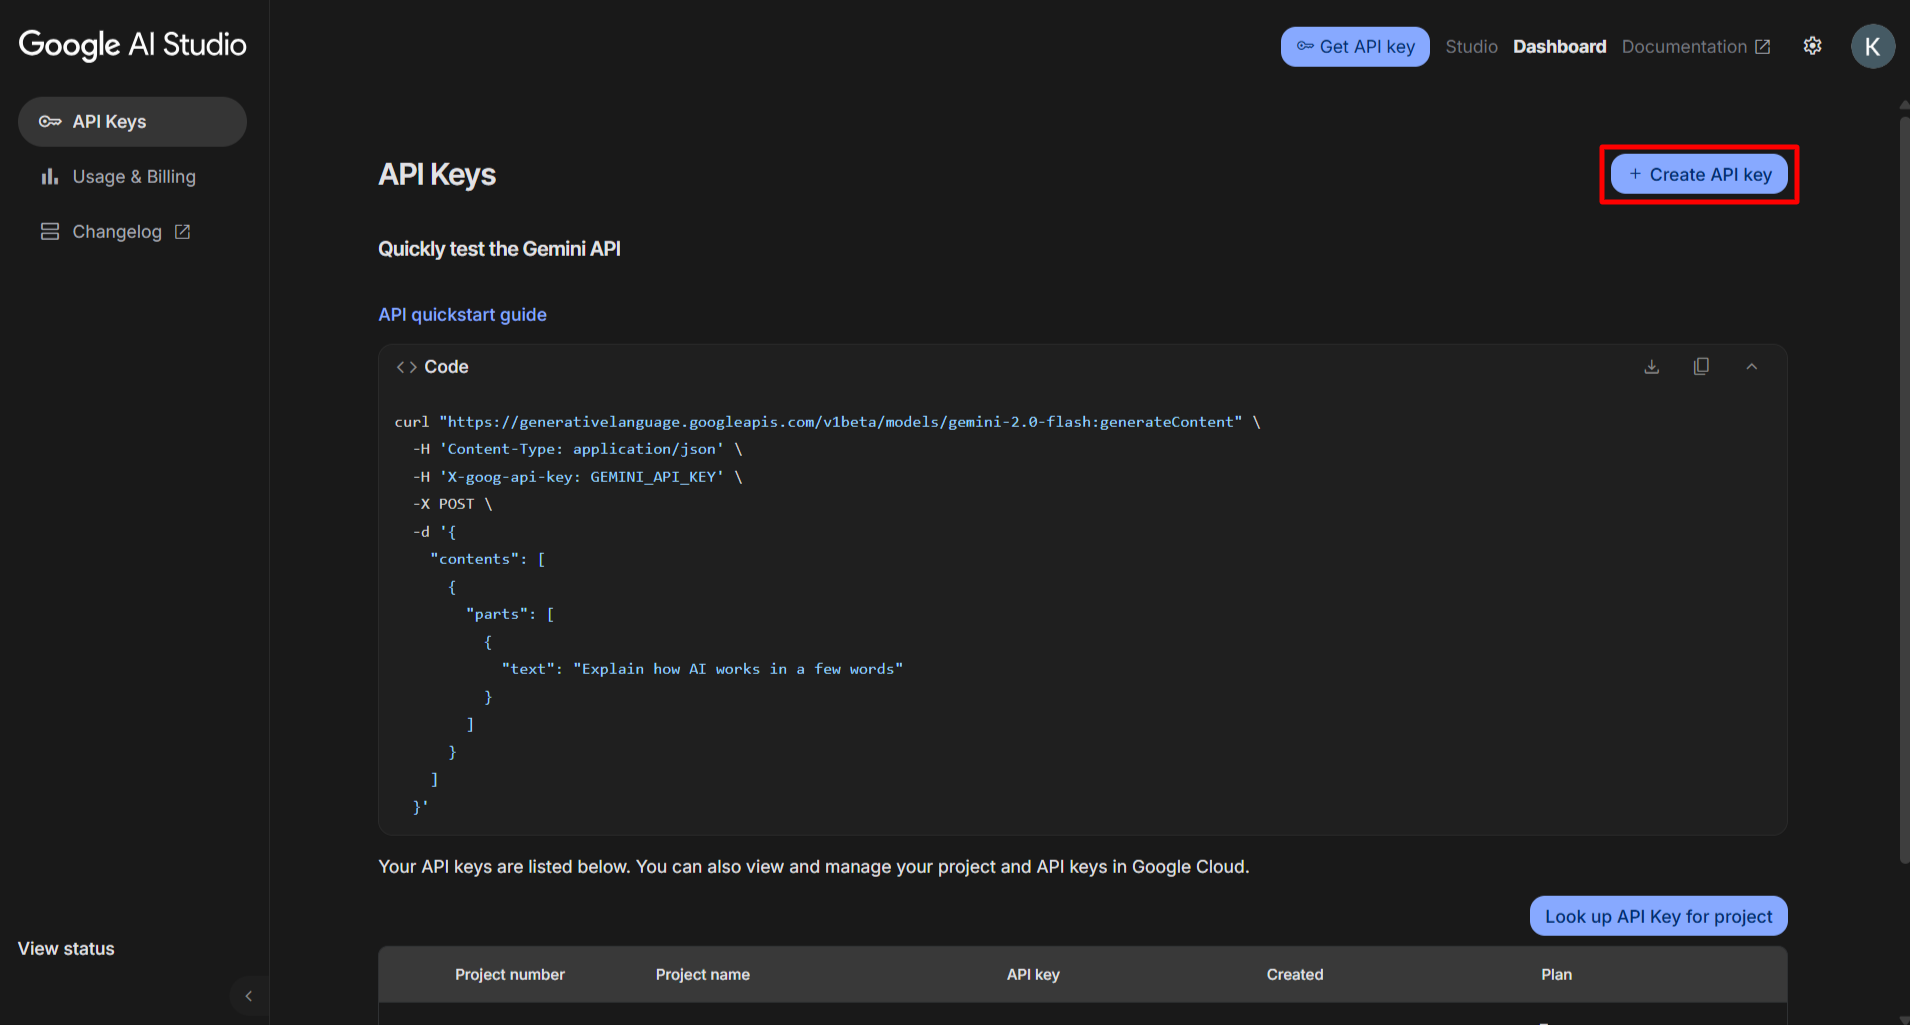
Note: To disable this feature, navigate to Admin > Plans > Edit Default Plan, then turn off AI Chatbot in the Features section.
You can choose a model from the following link: Gemini Models
Perplexity
This feature allows users to use Perplexity during the meeting. Follow the steps below to setup Perplexity.
- Go to this link https://www.perplexity.ai/account/api/keys and create new secret key as shown below.
- Once done, copy and paste the Secret key in the Admin > Settings > NodeJS. For detailed clarification of each configuration, please check the Signaling section above.
Note: To disable this feature, navigate to Admin > Plans > Edit Default Plan, then turn off AI Chatbot in the Features section.
You can choose a model from the following link: Perplexity Models
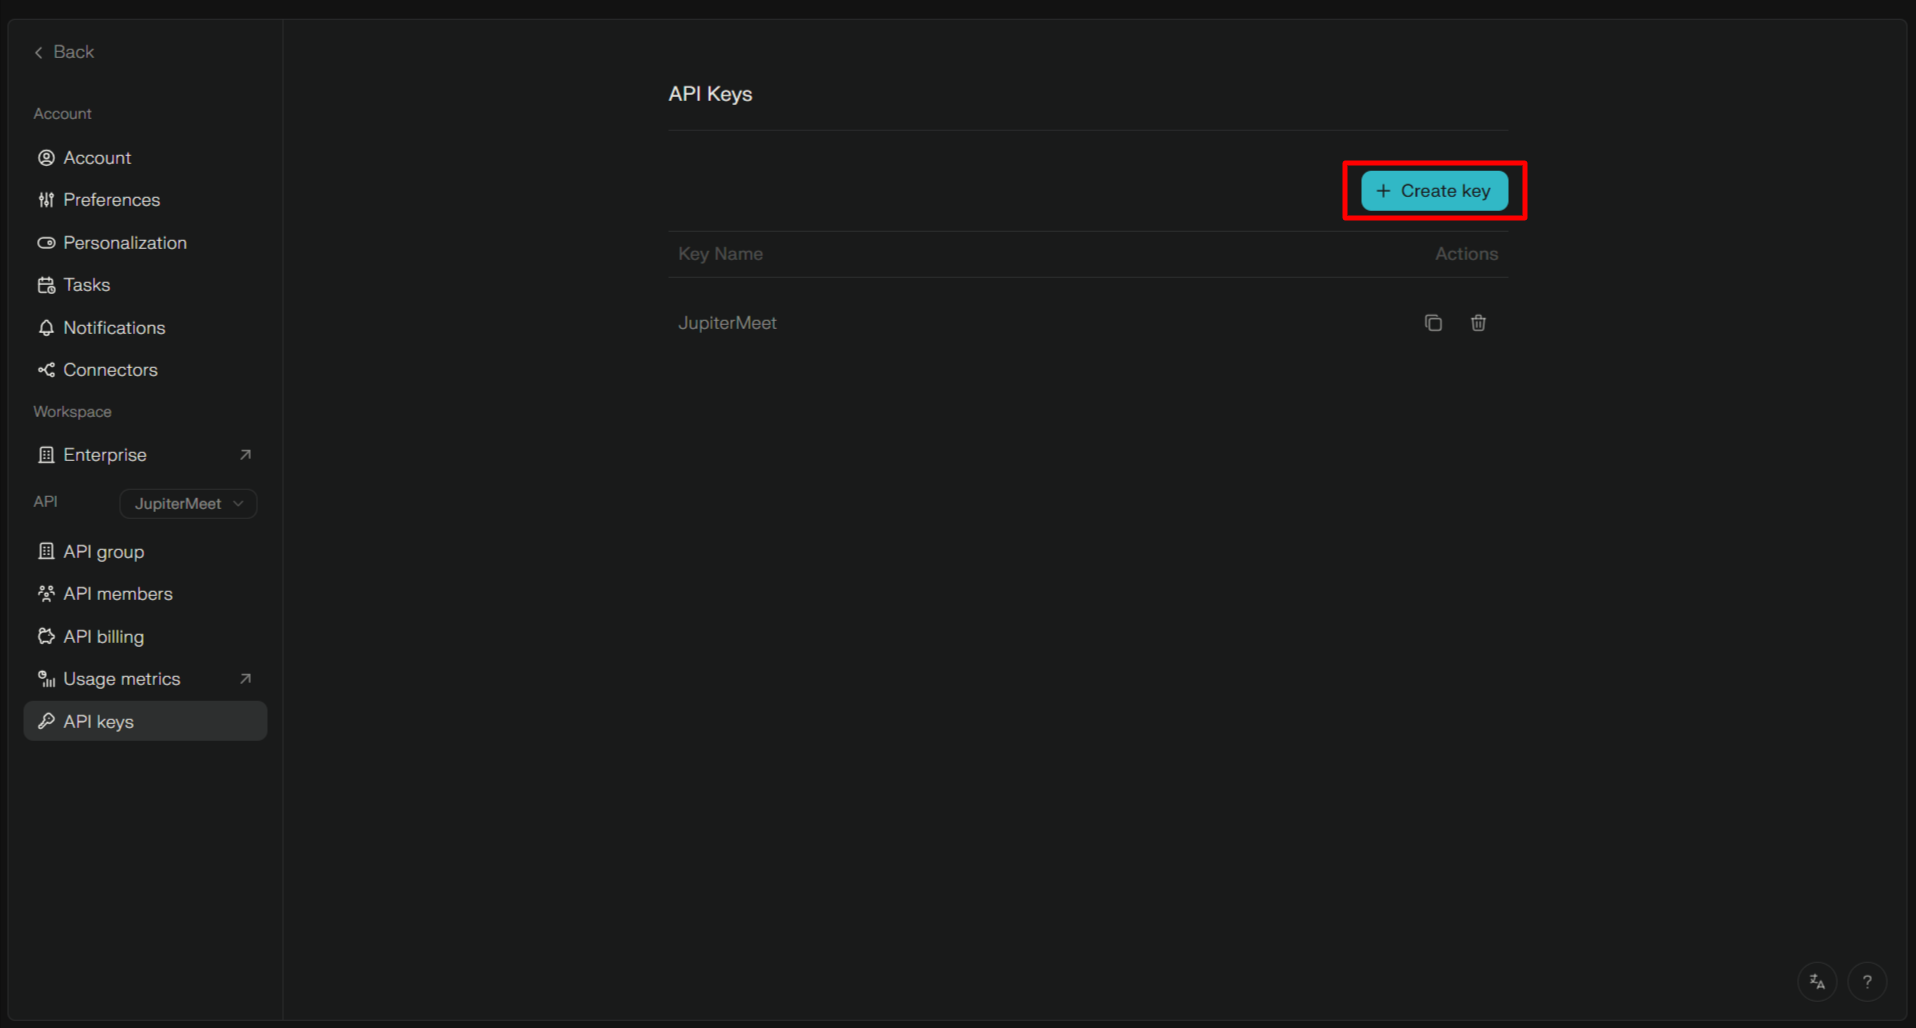
Grok
This feature allows users to use Grok during the meeting. Follow the steps below to setup Grok.
- Go to this link https://console.x.ai/team/95af8c64-7035-4b42-a256-d4b8d31d76c8/api-keys and create new secret key as shown below.
- Once done, copy and paste the Secret key in the Admin > Settings > NodeJS. For detailed clarification of each configuration, please check the Signaling section above.
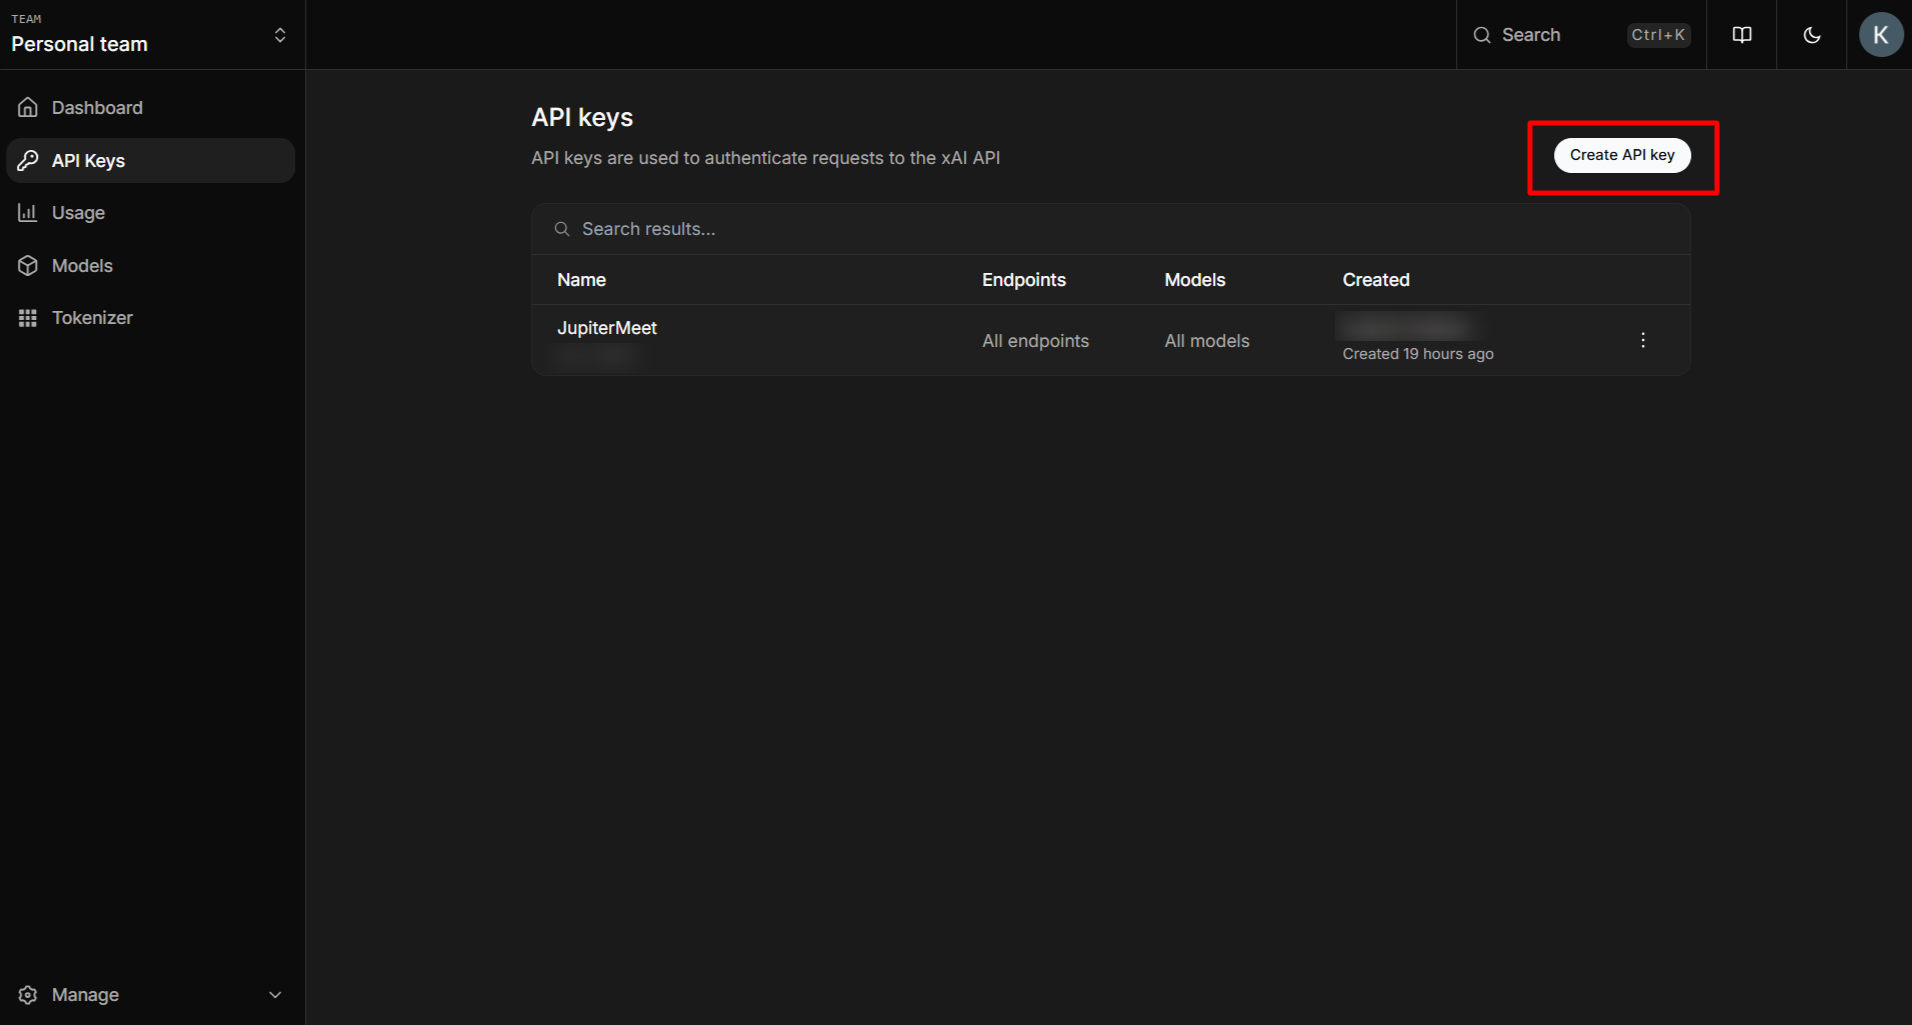
Note: To disable this feature, navigate to Admin > Plans > Edit Default Plan, then turn off AI Chatbot in the Features section.
You can choose a model from the following link: Grok Models
Social Logins
Google
Navigate to the below link and create new project.
https://console.cloud.google.com/projectcreateThen click on OAuth client ID as shown below.
https://console.cloud.google.com/apis/credentialsThen click on "Configure consent screen", then click on "External". Fill up all the information.
At last, go to the Global config section and copy Callback URL. Place it at the place of Authorised redirect URI, and click "Save".
Facebook
Navigate to the below link and click on Create App.
https://developers.facebook.com/appsThen follow the below steps,
Fill out the below form and click on Create app button.
Copy Callback URL from the global config section, paste it below, and click on Save changes.
LinkedIn
Navigate to the below link and click on Create App.
https://www.linkedin.com/developers/appsThen fill out all the information,
Then choose Sign in with LinkedIn
Click on the Auth section, copy client Id and secret and paste in the global config section. Finally, copy add redirect URL and paste it as shown below.
Twitter
Navigate to the below link and click on Add project.
https://developer.twitter.com/en/portal/projects-and-appsThen fill out all the information,
Copy and paste the API key and secret to the global config section.
Once done, click on the Set up button.
In the next screen, set App permissions to Read. Set Type of App to Web app. Copy Callback URL and paste it to the App info section.
Finally, copy the Client ID and secret and paste into the global config section.